Cannabutter Chocolate Truffles

I love a little piece of chocolate before bed, especially when I add a small amount of cannabutter for the relaxation of an edible ... without the huge price tag!

If you prefer to just make these without the THC, just substitute the cannabutter with regular butter. I completely took the recipe from Sally's Baking Addiction and adjusted it for my needs.

Make sure all your cannabutter treats are very clearly labelled so friends don't pop by and accidentally eat three or four of these before they realize. Sorry about that Doug, but the cookies were just cooling on the counter!

Ingredients

    8 ounces of high quality chocolate, very finely chopped
    2/3 cup whipping cream
    30 grams Cannabutter
    1/2 teaspoon pure vanilla extract
    toppings: (optional) unsweetened cocoa powder, sprinkles, crushed nuts, melted or tempered chocolate

Instructions  

Place the chocolate in a heat-proof bowl. Set aside.

Heat the heavy cream until you see little bubbles around edge of the pot. Don’t overheat, this should not boil. You can use stove or microwave. 

Add the cannabutter to the heavy cream until melted. Pour this mixture evenly over the chipped chocolate and without stirring, allow it to sit for 5 minutes minutes. Add the vanilla and stir until the chocolate has completely melted.

Forming the truffles: 

 Method 1
Immediately after stirring everything together and before it hardens too much, pour the mixture into silicone candy moulds and freeze about an hour. Pop out of the moulds, label and freeze in bags.

Method 2
 Pour chocolate into a shallow glass baking dish & set in the fridge for an hour or two. Scoop the set truffle mixture into 1 Tablespoon-sized mounds. I weigh out the amount for consistency. Roll each into balls. This gets a little sticky, so keep the mixture cold.  Roll each into toppings, if desired.
Label clearly. Cover tightly and store truffles at room temperature for 3-4 days or in the refrigerator for up to 2 weeks. If freezing, don't use toppings.

Notes: Truffles taste best at room temperature! Thaw in the refrigerator, then bring to room temperature, if desired, before enjoying. I usually pull them out a few at a time and keep them in the fridge for treats.

Ketchup Verde Picante

What do you do when you have too many green tomatoes? 

You get creative! 

I have been very lucky this past summer to have been able to take a little vacation during June, lasting into the first week of July. Needless to say, the garden just had to wait. 

Our starter tomato plants were well cared for by our house sitter, but they didn't get out into the garden until very late. Luckily we had a long long summer and I was starting to get ripe tomatoes on the vine for a month before first frost. 

When I picked all the green tomatoes, there were four big boxes of potential goodness from just four little plants! 

6 pounds green tomatoes, washed and chopped
3 pounds onions, chopped
1 tablespoon black pepper
1 tablespoon dry mustard
1 tablespoon Worcestershire sauce
1 tablespoons mixed pickling spices, in a tea egg or cheesecloth bag
3 Tbsp dried jalapeno peppers
1 Tbsp dried Thai peppers
3 Tbsp chopped fresh ginger
2 cups white vinegar


1 cup honey
1/4 cup pickling salt *to taste

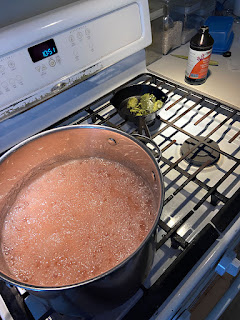
To make this fabulous condiment, place everything but the honey and salt in a large stock pot and bring carefully to a boil. Reduce the heat and simmer for three hours. Remove the spice bag!

Using an immersion blender, blend the veggies until rather smooth. If you care to remove the seeds, you can put them through a food mill or sieve. It makes a smoother end product but doesn't effect the flavour.

Put the ketchup back into the large pot, bring to a slow boil and add honey and salt to taste. Simmer until it is thickened. 

Meanwhile, prep your jars and lids for canning in a hot water bath. You will need enough jars for about 8 cups of finished product. 

Carefully fill sterilized jars to 1/2 inch from top, wipe the rims and cap with sterilized lid & ring. Place back into the water bath,  making sure the water is 2" above the jars. Cover and bring to boil. Boil 15 minutes. Remove from water bath and let them sit until cool before labelling and storing in a cool, dark place. If any of the jars have not sealed, put them in the fridge and use within 3 months. 


Yummy Fruity Gummies

I've made a few different gummy candies using different kinds of juice, including black current, blueberry, and now with crab apples. The results were just delicious, with a look and texture of old fashioned Turkish Delight, and the tart flavour of crab apple. Time to write out my methods! 

Why did I use pectin? I know lots of people are having success with gelatin gummies, but I wanted to use only fruit juice, sugar and pectin. While they are not as simple to make, they freeze better, taste better and suit my vegetarian friends. 

You will need a heavy pot with high sides so it doesn't boil over, a candy thermometer, and a 9x9 pan lined with parchment paper, and sprinkled with sugar.  (and some patience)

2 cups crab apple juice
4 cups sugar
1 Tbsp butter
2 Tbsp lemon juice
1 box (2 pouches) of liquid pectin
2 Tbsp cannabutter (optional add 1/4 tsp Sunflower Lecithin)

icing sugar for dusting

Smoked Rainbow Trout


Got fish? Here are four smoked trout recipes we have created to share with our friends and families. Gently smoked with alder, apple and Pacific Blend.

We are fortunate to live in a place where we can catch some amazing rainbow trout, weighing in at between 5 - 10 lbs each. Unbelievable fun for us to go fly fishing with friends in the late winter and early spring, mostly finding success with a Woolie Bugger trout fly. But you have to be warmly dressed and ready for rain. No "fair weather fishing" here! Once the lake warms up in the summer, the fish are too soft to use. 

The rainbow trout we have been catching are more like salmon than trout for size, but has the delicate flavour of rainbow that you just don't want to lose through too much seasoning, or improper handling. The size of the fish, and the need to process them quickly presents an opportunity to be very creative so as to not waste a morsel of food. We gut the fish as soon as they are caught and keep them in a cooler with ice, even on the lake.

As soon as we get home, I sharpen my knife and fillet the fish for eating, smoking and sharing. (I make broth from the heads, bones and fins, and when I strain the broth, I grind the solids together with oats, apples, eggs and flour to make dog cookies. Recipe to follow)

In order to have evenly cooked fish, it should be consistent thickness and size. The fillets of these trout have a variety of thicknesses, with the tail and rib areas being half the thickness of the top of the fish. Separate these, and you will have an easier time. 

I sharpen my knife again (important) and then cut the tail & rib areas into 3 - 4" square slabs, and after removing the pin bones along the thickest part of the flesh, cut the rest into 1" cubes for smoked nuggets. I prefer the nuggets skinned, but leave the skin on the slabs and fillets.

Each recipe uses a different, but similar method for brining the fish. The first two are dry brine and the last two are a liquid brine. Once you have your fillets or nuggets cut, rinsed and patted dry, choose the recipes that suits your tastes.


#1 Salt & Pepper Smoked Trout

2-3 lbs trout or salmon fillets, rinsed and patted dry.
1 cup dark brown sugar
1 cup white sugar
1 cup kosher salt
1 Tbsp pepper

Mix the sugars, salt & pepper to make the dry brine. In a bowl or container, layer the fish fillets, coating with the rub as you fill it up. Cover and refrigerate for 8 - 10 hours.

Drain. Rinse very well. Pat dry and place on racks or cookie sheets far enough apart that they are not touching. Allow them to dry in the refrigerator for several hours, or overnight to develop a pellicle.* When the weather is cold, like it was when I made the last batch,  I put the dehydrator in the window, turned it on fan mode and air-dried the fillets for a couple hours to get the same effect.

*"Pellicle (cooking), a skin or coating of proteins on the surface of meat, fish or poultry, which allow smoke to better adhere the surface of the meat during the smoking process." (Wikipedia)

Preheat your smoker to 180F. Arrange the pieces skin side down on greased smoker racks and add a mild smoke like alder, apple or your own preferred flavour. Checking every half hour or so, smoke for about 3 - 4 hours or until the internal temp is about 140F. 


#2 Smoked Trout Nuggets

3-4 pounds thick portion of trout cut into 1" cubes
3-4 cups brown sugar
2 cups coarse kosher salt
2 Tbsp garlic powder
1 Tbsp black pepper
1 tsp cayenne pepper

Rinse and pat dry your trout nuggets. Mix sugar, salt and spices to make your dry brine. 

In a bowl or container, layer the fish fillets, coating with the rub as you fill it up. Cover and refrigerate for 8 - 10 hours.

Drain. Rinse very well. Pat dry and place on racks or cookie sheets far enough apart that they are not touching. Allow them to dry in the refrigerator for several hours, or overnight to develop a pellicle.*

Preheat your smoker to 120F. Arrange the pieces skin side down on greased smoker racks and add a mild smoke like alder, apple or your own preferred flavour. 

Every hour raise the temperature in the smoker by 20 degrees until it's 180 F. 

Checking every half hour or so, smoke for about 4 hours. 


#3 Maple Orange Trout

3 pounds trout fillets, cut into portions, rinsed and patted dry
2 cups cold water
1 cup maple syrup
1/2 cup demerara sugar
1/4 cup coarse kosher salt
zest of one fresh orange (best not to use dried peel)

Glaze:

1/2 cup maple syrup
1/4 cup orange juice

Mix the water, syrup, sugar, salt and peel in a big bowl. Mix to dissolve the sugar & salt. Submerge the trout fillets in the brine, mix and refrigerate 8-10 hours depending upon how thick they are. 

Drain. Rinse very well. Pat dry and place on racks or cookie sheets far enough apart that they are not touching. Allow them to dry in the refrigerator for several hours, or overnight to develop a pellicle. 

Preheat your smoker to 160F. Arrange the pieces skin side down on greased smoker racks and add a mild smoke like alder, apple or your own preferred flavour. After the first 15 minutes, brush with the glaze every half hour. Smoke for about 3 hours or until the internal temp is about 145F. 


#4 Maple Candy

2-3 lbs trout nuggets cut in 1" cubes and rinsed
1 cup demerara sugar
1/2 cup coarse kosher salt
1/2 cup dark maple syrup 
2 cups water

Glaze

1/2 cup dark maple syrup

Mix the liquid brine in a large bowl or covered container, and add the trout nuggets, stirring to submerge. Cover and refrigerate 8 hours. 

Drain. Rinse very well. Pat dry and place on racks or cookie sheets far enough apart that they are not touching. Allow them to dry in the refrigerator for several hours, or overnight to develop a pellicle.

Preheat your smoker to 220F. Arrange the pieces skin side down on greased smoker racks and add a mild smoke like alder, apple or your own preferred flavour. After the first 15 minutes, brush with the maple syrup glaze every half hour. Smoke for about 3 hours or until the internal temp is about 140F.


PLEASE NOTE: The rainbow trout we are catching are not native, but escapees from the local fresh water fish farm. Whenever we catch a native cut-throat trout, we release them.


mango icecream

 With the kind of dietary issues Will has, we have been unable to buy commercial ice cream for quite a while, but I bought this very easy to operate and fast little ice cream maker, and started the experimentation to perfect an ice cream that doesn't include the many forbidden ingredients. 

With lactose intolerance, low FODMaP's diet,  and low Histamine diet we cut out most dairy, sugars, fruits and berries that you normally get in ice cream. But this recipe not only works, it's delicious as well. 

1/3 cup sugar
2 Tbsp cornstarch
pinch of salt
1 can coconut milk
3 egg yolks, slightly beaten
2 Tbsp coconut oil
2 tsp vanilla
1 ripe mango, peeled and chopped


Mix sugar, cornstarch and salt in saucepan. Slowly add coconut milk, stirring with a whisk. Heat to a boil over medium heat. Boil for one minute.
Mix egg yolks in small bowl. Slowly add the hot pudding mixture in a thin stream, whisking constantly until well blended. Pour back into the saucepan and reheat over medium. Boil one minute. Remove from heat and stir in the coconut oil and vanilla.
Chill custard mix until cooled. Stir in finely chopped mango.

Now to turn this delicious custard into ice cream!

I have a low tech Cuisipro ice cream maker that does the job in about 20 minutes, but you can just put your bowl of mango custard in the freezer and stir it up every couple hours until too thick to stir. 

I thought this blog's solution's were pretty spot on as well https://www.saveur.com/make-ice-cream-without-a-machine/

fall harvest cake

I have to admit that the hazelnuts & honey are from last year, but the applesauce, blueberries and blackberries are this year's crop. This is a lovely dense cake, definitely not sweet!

  • 1 cup Gluten-free flour
  • 3/4 cup light buckwheat flour
  • 3/4 cup hazelnuts roasted and finely chopped
  • 2 tsp baking powder
  • 1/2 tsp salt
  • 1/2 cup yogurt or mayonnaise
  • 1 cup applesauce
  • 1/2 cup honey
  • 3/4 cup melted butter
  • 4 eggs (beaten until light)
  • 1 Tbsp lemon or orange zest
  • 2 tsp vanilla
  • 3/4 cup blackberries
  • 3/4 cup blueberries

Preheat oven to 350 F. Line a 9" spring-form pan with parchment paper. 

Whisk together the flours, hazelnuts, baking powder and salt. In large mixer bowl combine the yogurt, applesauce, honey, butter, beaten eggs, lemon zest and vanilla and beat until creamy. Add dry ingredients and mix only until combined. Pour into spring-form pan and top with the berries. Keep most of the fruit towards the outer edge as they seem to creep to the middle of the cake while cooking!

Bake in centre of 350 F oven for 55 minutes.

cornbread with fresh corn

Fresh corn from local farmers is in the stores again! I just had to try adding fresh corn to my corn bread recipe. (I heard about this on Season 5 of Queer Eye) So delicious!

1 cup gluten-free flour
1 cup medium cornmeal
2 tsp baking powder
1/2 tsp salt
1 cup Silk coconut milk mixed with 1 tsp cider vinegar
2 eggs
1/3 cup butter
1/2 cup sugar kernels of fresh corn cut from one cob (about 3/4 cup)

Mix the coconut milk with cider vinegar and set aside. Melt the butter in a cast iron frying pan. Cut the corn kernels from the cob.
Preheat oven to 400 F.
Mix the dry ingredients in one bowl and the wet ingredients in another. Stir together until completely mixed but no more. Pour into the still warm cast iron frying pan, and place in the middle of the preheated oven.
Bake 25 minutes.
Serve warm and crispy! Will smothers his with maple syrup!